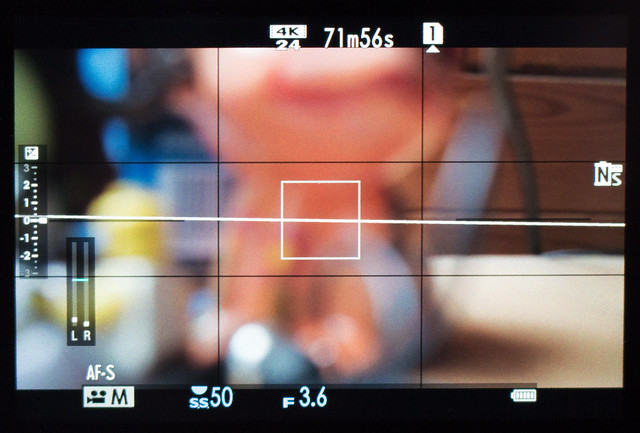
However, there is some learning value to the few useable clips I did shoot, so I relented and decided to post the clip. It's definitely not a particularly interesting clip, and neither is it well shot (my hands were shaking like leaves in the wind throughout the shoot) but it does serve as useful reference for some things I thought I'd try out...
A positive note: I should add some positives here, as this all sounds a bit negative. I actually did get a couple of things out of this experiment; it was great to actually have some pieces of raw 4K footage to practice my editing workflow with and I was also pleased with my ISO camera settings. I simply left the camera's ISO dial on 'A' (Automatic) and it did a very good job, the video you see above is a pretty true reflection of the natural light on that day as it was gray and overcast. Normally I would choose a manual ISO setting, but the auto setting impressed me (so it's not all bad)!
Footage Notes
Equipment: Fujifilm X-T2 mirrorless camera and Rode Stereo VideoMic Pro. No tripod.Location notes: Peasholm Park, Scarborough, Weather was overcast.
Purpose of shoot: To test and practice 4K filming process and workflow and to try out a simulated 'flat' colour profile setting. I also wanted to see what handheld footage would look like and how much the Fuji's lens stabilization would assist me to take steady footage.
Microphone settings: No 'dead cat' attached (despite it being a windy day) so turned on the high-pass filter and set the gain setting to +20dB boost. I also set the Fuji's in-camera audio levels to about 25% so that - in combination with the mic's gain boost - I would (hopefully) minimise hiss.
Camera settings: Basic camera settings for 'film look' video were - Shutter speed 1/50th, frames per second 24, ISO auto. I used auto-focus ('S') on the X-T2 rather than manual, just for simplicity sake.
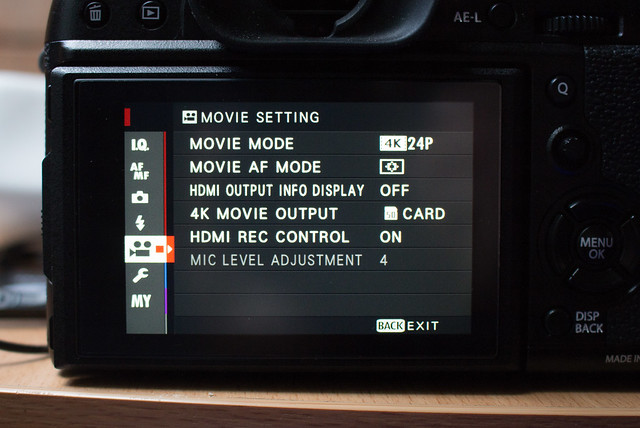
X-T2 tip: Some people have been scratching their head and wondering how to set 1/50th fps using the shutter speed dial (as the settings on the dial go ...15...30...60...125..., etc). First, select '15' on your dial, then use the back command dial wheel to adjust the fps up to '50'. Yes, I wish Fuji had included a 50fps setting on the main dial too!
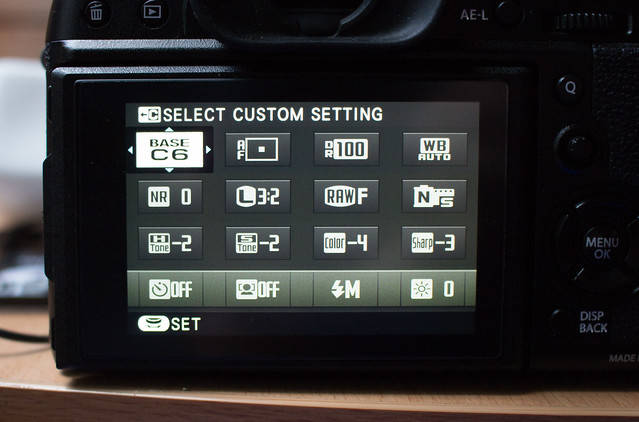
Simulating a 'Flat' colour profile: In its review of the X-T2 DSPhotoBlog.com suggests a method of creating a sort of faux-FLOG using custom settings: "Without the FLOG you can still get a pretty flat looking video. You switch to the Pro Neg Hi Std Film simulation and set the shadows and highlights to -2, color to -4 and sharpness to -3 or -4."
Post edit software: CyberLink PowerDirector 14 on Windows 10 PC.
File information: Format - MP4 (.mp4). Resolution - 4K, 4096 x 2160. Size - 576MB.
Postscript - why a 'flat' colour simulation?
I mention that I one of my goals for the shoot was to try and create a faux-FLOG, to understand why it helps to understand what FLOG (Fuji's version of LOG) is:
"In a nutshell, recording using a LOG picture profile or curve preserves more of your image’s dynamic range and tonality by redistributing the digital exposure value representations over the entire value set using a preset logarithmic function." [BHPhotovideo.com]
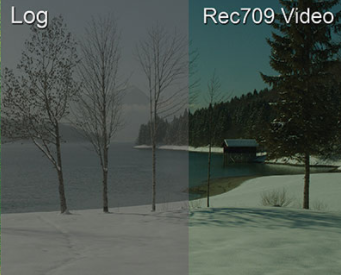
Er, or, simply put, it's all about preserving as much exposure information as you can in your footage so you can play around with exposure and colour grading in post without losing detail. It's kind of like a video version of still photography's RAW file format.
For example, if you shoot a piece of footage that is too contrasty (blowing out highlights) you can never recover any detail in those highlights in post. LOG footage is often called 'flat' or 'neutral' and looks a bit wishy-washy and grey, that is because it tries to retain detail information in all areas - shadows. midtones and highlights - so you can access those details later when editing and correcting colour and exposure.
 |
| Picture source: Blog.abelcine.com |
Now, unfortunately, the Fujifilm X-T2 cannot record LOG internally* - you have to record Fuji's LOG format to an external recorder via the HDMI output. This is a wee bit expensive to do at the moment and I can't afford one of these external recorders, so I am having to cheat and simulate a 'poor man's' flat file.
My test video above show the result of this attempt, which is another reason that it looks a little 'grey' and washed out. I used some settings suggested in a post on DSPhotoblog.com to sort of buff up the detail in shadows and highlights. It's not the same as a proper LOG recording, but it will allow me some latitude when trying to colour grade and adjust exposure in post.
*There are a lot of rumours that Fuji might add internal LOG recording to the X-T2 via a firmware update at some point.
No comments:
Post a Comment