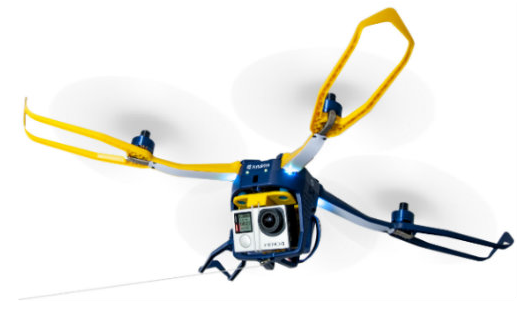
Time to try out my Fotokite - half drone, half kite, maybe - after all, I've had it long enough. But, before I attempt a full on outdoor filming test, there is the little matter of charging it, updating the firmware and learning the controls.
The charging of the 1300 mAh Polymer Li-ion battery can take between 1 and 3 hours. This is dependent on the charger used (say Fotokite), and by this I think they mean whether you plug the USB charger lead into something like a USB port on another device or directly into a USB wall plug or adapter. I opted to charge mine via a wall socket adapter and gave it a good three hours.
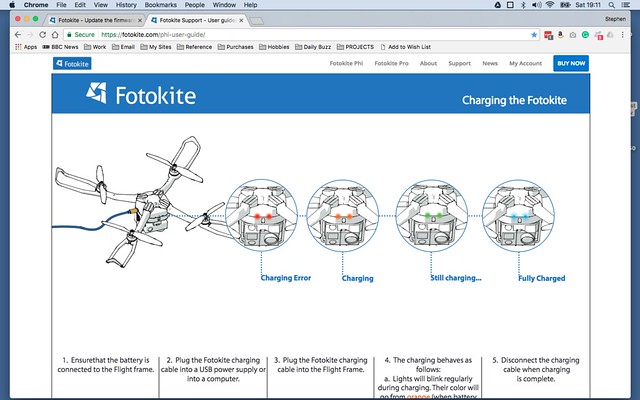
"Once you’ve plugged in the USB-C cable into your Phi, the LEDs will turn on and start blinking on a regular basis. The LED colors will go from a red/orange when the battery is almost empty to a green when it is almost full. You should also be hearing a clicking sound during the charging procedure. Once the battery is full, the LEDs will turn to a teal color." [Fotokite FAQ.]
I did have a little issue with their statement that the LED lights turn a teal colour when the Fotokite is fully charged. I could only ever seem to get the LEDs to flash green, no matter how long I left the Phi plugged in. Strange (I will email them about this).
Charging time = Flight time: Fotokite suggests that a full 3 hour charge should equate to 13 minutes flight time. This may seem short, but do remember that the battery is also powering the GoPro camera as well!
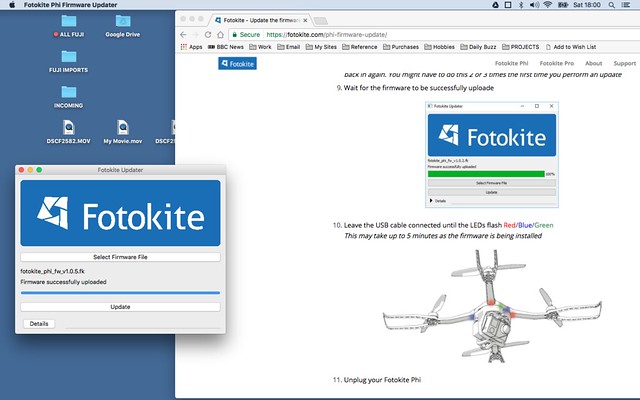
Anyway, charging done I moved onto updating the firmware. There is a new firmware update out already, which is good to know as it looks like the Fotokite people are pretty responsive to user feedback and include improvements based on those comments. The process is relatively fast and very easy and the updater software is available for both Windows and Mac OS (I'm pleased to say).
Anyway, to the main event, the first test flight! This was a very rudimentary test, I'm afraid, with nothing all that exciting going on and no filming with my GoPro camera (which I installed on the Phi). I just carried out some simple control tests - yaw, orbit, ascend and descend - so that I could gain some familiarity with the flight controls before I attempt an outdoors flight...
Well, I managed not to take out the lounge light or the TV so I think we can say that this was a success. :)
The method of controlling the Phi is a little quirky, it's done via the hand-controller but involves just two buttons which activate Phi orientation when pressed in combination with specific hand movements. It's easier to see than to describe, so pop over to the Fotokite 'Quick-start video guide' web page...
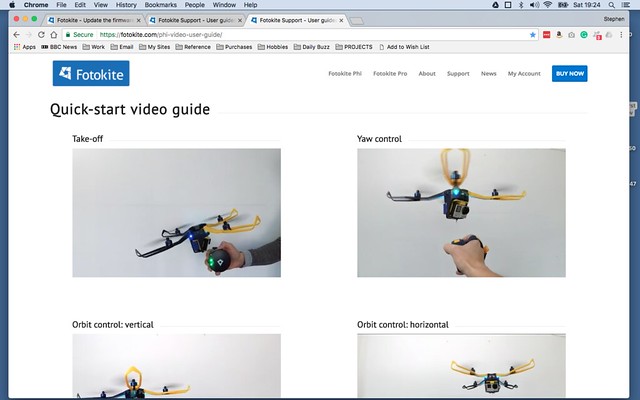
This will take a wee bit of getting used to and a lot of practice, but I picked it up (sort of) after 5 minutes or so. Though, only through repetition will I eventually master the Fotokite.
However, there were some very pleasing outcomes, I learned that you can point the GoPro in the direction you want (via the Orbit function), so you can have the camera pointing away from you. I'm really pleased about this as many of the promotional movies I have seen so far have featured the 'aerial selfie' mode where the camera is pointing back toward the user.
In the selfie mode you are able to see the tether, so, by pointing the Phi away from you, you can 'hide' the tether and film footage that looks very much like traditional drone footage.
What next?
Well, I'm going to have to make some notes of the various LED light functions as all communication with the Phi is done via the lights or the occasional vibration of the hand controller. There are no fancy visual instrumentation or an app, so you really have to be on the ball as to what the LED lights mean (especially the combination that tells you the battery is running low)!
It's all in the manual (which is available online at fotokite.com/phi-user-guide/), but I'm one of those people who doesn't take in information unless I've written it down.
Once I feel I have digested enough of the instructions, I can move on to my first exterior flight and also get some filming done. I'm keeping a close eye on the weather reports to see if there will be a suitable day to do this this week (fingers crossed).