First thing to do when you have a new camera is to get straight out and take some test footage. I decided to go for a little walk in the local park to get some quick test shots...

I just wanted to get a feel for the iPhone's basic video capabilities using the native camera app. Practise makes perfect so I intend to go out as much as I can to get little examples like this, in this way I can become familiar with the base-line quality of the footage from this smartphone.
To move on and up from here, however, there are a few basic items that I will want to improve my abilities, which are letting the possibilities of this excellent movie camera down. For example, as I found in my test shoot, despite the fact that the iPhone 11 has a quite impressive built-in stabilisation this is somewhat off-set by my incredibly shaky hands! 😵 So, for this and some other reasons, a gimbal - like the DJI OSMO 4 - is at the top of my iPhone movie making wish list.
But, before more advanced gear like a gimbal, there are some basics that I need to get me going based on the lessons I learned from my first outing...
Space, the iPhone Frontier?
When I chose my new phone the iPhone was not my first choice! I was originally going to go for a good camera phone that had the ability to take mini SD cards (like my old Samsung) so I had plenty of space for filming (which I could replace if needs be).
Sadly, when I compared camera features my best choices came down to the Samsung S21 and the iPhone 11 - which are roughly in the same price bracket for my wallet - BUT neither supported memory card expansions! Shazbat! 😟
 |
| 64gb can seem a little bit tight when you want to film in 4k quality! What to do? |
[Note: Now, obviously the most convenient and fast means of file back-up are direct connection using a Thunderbolt to USB cable to attach your iPhone to your main computer. But out in the field a compact and more mobile option - like external storage - makes more sense.]
With little seeming advantage I plumped for the iPhone, but this left me with the issue of space and how to save and transfer a lot of BIG 4k movie files while on location! 😦 (Worse, I could only go for the 64gb iPhone, which make this a very big issue.)
What easily transportable external storage options do I have for the iPhone I wondered...
While flash drive storage seems - to me - to be the way to go (carrying an additional power bank to power a SSD seems a bit of a faff) they are kinda expensive for a decently sized one. As I already have a good collection of SD memory cards for use with my Fuji XT-2 camera I simply bought an Apple memory card reader to make use of this means of transfer...

I gave it a try and it indeed works OK but is a little slow when transferring a lot of files. How this would compare speed wise next to a flashdrive would be interesting to compare and maybe at some point I will end up buying a flashdrive so I have options and I will compare them. But, for now, this has solved my mobile memory transfer issue.
Camera Stability Basics
Judging by some of the first footage I took with my new iPhone I think the smartphone's built in stabilisation is very good. In fact I would say that it's every bit as good as the stabilised footage I have gotten in the past from my GoPro & Feiyu G4 3-Axis Gimba combo. This little extract shows two examples of the stabilisation and Apple's native camera software's Slo-Mo facility at work...

Now, I mentioned that at some point I will buy myself a gimbal and while I feel they are a very desirable piece of equipment I have to solve my shaky hands and camera grip issues now - until I can afford a gimbal - and also maybe I don't always want to carry around a (relatively) big bit of kit. What's an easy way to give me some extra stability at a low price that doesn't add too much extra weight?
Luckily, I already had some bits in my movie-making stash that solved this...

Before adding other stabilising accessories I had to find a means to mount my phone to them. The above picture shows the JJC Universal Tripod Mount Holder for Smartphones, this mini clamp allows you to insert your phone into it's expanding grip and it has a quarter inch tripod screw mount on the bottom and a cold shoe mount on the top.
Now I have a means to attach some additional kit I had a rake around in my attic and found my old GoPro hand grip...

This is a really comfortable pistol grip style handle which attached to the JCC's screw mount and give me a nicely balanced and fluid range of movement while holding the smartphone while filming. I find the traditional 'holding the phone at either end between the fingers' grip style that is used by most to be not the most steady nor the most comfortable. The pistol grip gives me a one-handed and very smooth range of movement while filming - you feel like you are aiming the phone rather like a pistol. It works for me!
In a way, this pistol grip technique is a bit like a poor man's gimbal, using you arm and elbow joint to smooth out flowing panning shorts. It's not perfect, but it's cheap, versatile, light-weight and doesn't require any batteries! 👍 A very nice back-up even if I do get a gimbal soon.
Finally, there is one piece of stabilisation equipment any serious videographer cannot do without and that is some form of tripod or monopod...

I already have a nice Koolehaoda Camera Aluminum Monopod with Fluid Head - it's a light weight expanding monopod but has a folding tripod style 'foot' to aid stability. Adding a little extra bulk to the monopod is a very nice fluid video head, the smoothness of the head's movement is worth the extra weight, but even so the Koolehaoda (try saying that fast) only comes in at 2.2 pounds!
As with the above mentioned Rode VideoMic Pro microphones there is one fly in the ointment regarding their use with a iPhone 11 and that is the removal of the 3.5mm jack input from the phone. Now, any 3.5mm equipped item - like headphones or mics - require a adapter dongle that converts the 3.5 into a Thunderbolt input! Darn it!
Audio Matters
Actually, from the little I have done so far with the iPhone 11 I was quite impressed with the sound recording quality. However, that was just unfocused environmental audio, as many have found recording narration - for vlogging for example - is a little less satisfactory, especially if there is a lot of extenuois noce going on around you.
For me, there is two types of audio recording that require two different approaches with equipment. There is narration recording, which requires more focused microphones to pick up clear voice audio and then there is environmental recording where you need a wider pick up to gather a sense of your location.
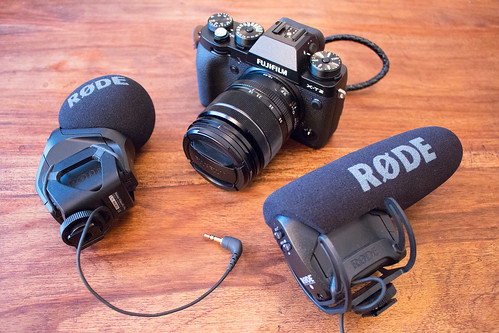 |
| These two Rode microphones, which I already have in my inventory , exemplify the two main types of sound recording you might want to do when filming outside. On the left is the Stereo VideoMic Pro which is indented for a wide capture of sounds and is suitable for recording music, and the atmospheric ambience essential in building a realistic audio scene. On the right is the VideoMic Pro which, conversely, is a 'shotgun' style of mic designed to focus in on a primary source of sound, like a interview commentary, for example. |
Some might class these two different types of recording as primarily 'A' roll and 'B' roll situations. But it's not quite that simple, still it's all about what you feel is the most important sound and then you use appropriate equipment to pick up that sound and hopefully minimise others.
As the above picture show, I am lucky in that I already own two very good quality mics intended for video recording - albeit usually on top of a DSLR or camcorder style of camera. These mics might be considered a little on the bulky and weighty side for smartphone filming but I want to give them a try in order to save me forking out on additional equipment. Though I will have to figure out how to mount them!
The highly under-rated Stereo VideoMic Pro is my favourite as I love getting good environmental soundscapes - the sound of the waves on a beach, bird song in the countryside or in woods, or street life recording - so I can see this being my go-to mic on a lot of occasions.
One final type of recording mic I do think is very useful, however, is the lavalier mic. Again, this is a focused pick-up which is ideal for interview or vlogging where you want to get good commentary. BUT, as usual, adding a lav to the iPhone is not quite as straight forward as just 'plug and play' (what is with Apple)! 😆
 |
| The Rode Lavalier Mic Kit. |
 |
| The UGREEN 3.5 to Thunderbolt adapter cable. |
...BUT on top of that to accommodate Rode's use of TRS 3.5 plus you then have to add a special TRS to TRRS adapter in order for their mics to work with the iPhone! 😖😆
 |
| RØDE SC4 iPhone Accessory. |
I have a headache now! (And this is even before I discuss the other things I use when recording commentary in doors! But let's not go there for now!) 😆
-----------------------------------------------------
And that's it for part 1 of this overview of my iPhone 11 film making kit, in part 2 I will assemble the final bits and pieces and lay them out as a complete ensemble and then take them out for a 'test drive'! 😁
